Homemade NYC Style Pizza – Pizza Steel for a Crisper Crust
By Chef David
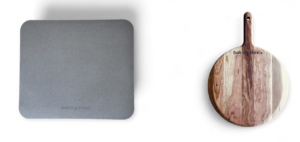
Traditional New York-style pizza can be made in a home oven with a pizza steel or stone. Each produces a slightly different pie. Steels are made of food-grade steel, which conducts heat better and stores more heat per unit volume than stone. Steels produce pizzas with a crispier, airier crust. Stones are made of terracotta clay, ceramic, or cordierite and fired at high temperatures, like pottery, which makes them strong and heat-resistant.
- Stones tend to be less costly, smaller, and lighter. They range in thickness from 1/2-inch to 1-inch, and weigh between eight to thirteen pounds. While the thinnest baking steels are 1/4-inch thick, but weigh over 16 pounds.
- Steels reduce cook time, especially when making multiple pies. But steels require a larger oven space (with clearance of 2 inches in all dimensions) and take more time to cool down (which is why people opt to leave their pizza steel in the oven between bakes).
The other difference is that pizza stones can break when dropped, while pizza steels are indestructible – they can last for a lifetime.
Which should you use? It depends on how you prefer your pizza. Select steel for a black-spotted crustier bottom, New York City pizzeria style, or stone for a softer slice or a lighter option. Steels and stones can be used to cook other things, like crusty artisan bread or crispy roasted vegetables, and steels can double as a griddle on the stovetop.
Baking Steel Comparison
Pizza steels are simple yet sophisticated. They are low maintenance, requiring only occasional seasoning.
Care: Hand wash with warm water and a non-abrasive cloth. Avoid using harsh soap to preserve the seasoned surface. After cleaning, thoroughly dry the steel and coat it lightly with oil to prevent rusting. Regular seasoning enhances the nonstick properties. Some experts suggest that steels don’t need to be cleaned at all and recommend burning off any stuck-on debris.
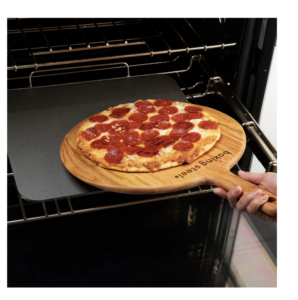
Use: Proper preheating is critical. The steel can reach temperatures around 500-600 degrees, or as hot as your oven can go. Be careful when reaching into the hot oven. To transfer the pizza into and from the oven, use a pizza peel – a flat wooden paddle. We used a pizza peel from Baking Steel,16 inches in diameter, handcrafted from premium-grade cherry wood. It is designed to handle small to medium pizzas. This peel worked well for us, allowing us to slide pizzas in and out of our oven easily.
About the Brands
We tested the Original Baking Steel and Dough-Joe. Both steels are made of ultra-conductive carbon steel, arrive pre-seasoned, and have rounded corners; the only noticeable difference is that Dough-Joe has a small hole in the corner, which can make it easier to grip the steel from a flat surface.
- Baking Steel was founded by Andris Lagsdin and funded by Kickstarter in 2012. We used their Original steel, which is 14 by 16.25 inches and weighs 15 pounds with a ¼ inch thickness
- Dough-Joe was introduced in 2014 by Joe Hurly and sells steels that come in three thicknesses (thicker steels contain more energy). Made of seasoned shot-blasted carbon steel, 15 inches square. Samurai ¼ inch thickness weighs 16 pounds, Shogun 3/8 inch thickness weighs 24 pounds, and Emperor ½ inch thickness weighs 32 pounds.
The difference in the steels is the thickness, with thicker steels retaining more heat (and weighing more).
Both Andis Lagsdin and Joe Hurley are pizza legends. Andis, who grew up and worked in a family-owned steel manufacturing business, Stoughton Steel, turned his passion into a profession. Steel’s conductivity enables pizza to cook faster and evenly at a lower temperature. The result is beautiful, thin, crispy crust, NYC pizza store quality pizza – made at home. According to Andis ‘Because steel retains heat better and conducts heat more efficiently, The Original Baking Steel will be the equivalent of a 900° wood-fired oven despite being in your 500° home oven.’
Andis still teaches free online classes on using his baking steel for pizza, pita, and English muffins. We attended his February 26 class and were impressed. He is knowledgeable and patient, answering questions from the audience. He made a beautiful pizza.
Our Process
While we waited for the oven to preheat, we shaped our pizza dough into a pie. Transferring the dough from the pizza peel to the steel required finesse and practice. On our first attempt, the pizza was a bit misshapen (but that had no impact on the taste, which was amazing).

In his class, Andis recommended coating the pizza peel with a mixture of regular and semolina flour to prevent sticking, letting the pizza slide onto the steel. It can take practice to get the pizza to slide off the peel. His method for shaping the pizza was helpful.
He moved slowly, and intentionally, and produced a perfectly shaped pie which he placed on the pizza peel.
Our Thoughts
Baking pizza using a pizza steel became a community event. The longer the pizza steel is heated, the faster it cooks, producing a series of pizzas, each better than the last, requiring a lot of willing volunteers to taste our finished product. The consensus was that the bottom of the pie was picture-perfect, black-spotted, crustier bottom, New York City style. We enjoyed the process, although getting a perfectly round-shaped pizza was not possible.
We experimented using a wide range of toppings, such as onions, mushrooms, cheese, and even veggie-burger crumbles. Like the bottom crust, the top looked pizza-store worthy and tasted great. We found that using ‘00’ flour (recipe below) created a finer dough that our tasters preferred.
One word of caution, pizza steels are heavy. When they get hot, they reach 500 degrees, so you may want to leave your steel in the oven overnight to cool down.
It’s worth the trouble, we made the best pizza, time and time again.
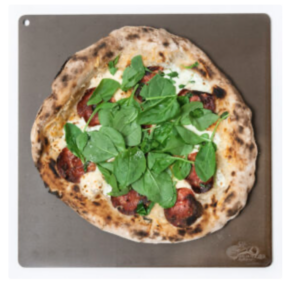
Pizza made by Dough-Joe
————————————————————————————————
Roberta’s Pizza Dough [adapted from the New York Times]
Preparation time: 20 minutes plus at least 3 hours’ rising (We recommend at least 24 hours)
Yield: Two 12-inch pizzas
Ingredients
- 153 grams 00 flour (1 cup plus 1 tablespoon). We used Bob’s Red Mill Flour
- 153 grams all-purpose flour (1 cup plus 1 tablespoon and 2 teaspoons)
- 8 grams fine sea salt (1 teaspoon)
- 2 grams active dry yeast (¾ teaspoon)
- 4 grams extra-virgin olive oil (1 teaspoon)
Instructions:
- In a large mixing bowl or stand mixer, combine flour and salt.
- In a small mixing bowl, stir together 200 grams (slightly less than 1 cup) of lukewarm water, yeast, and olive oil. Pour it into the flour mixture. Kneed until well combined, approximately 3 minutes, then let the mixture rest for 15 minutes. We used our Ankarsrum mixer to combine the ingredients.
- Knead the rested dough for an additional 3 minutes. Cut it into 2 equal pieces and shape each into a ball. Place on a heavily floured surface or bowl, cover with a damp cloth, and allow to rise for 3 to 4 hours at room temperature or 8 to 24 hours in the refrigerator. If you have the time, we recommend leaving it overnight. (If you refrigerated the dough, remove it 30 to 45 minutes before you shape it.)
- To shape the pizza, place each dough ball on a heavily floured surface. Use your fingers to stretch it, then your hands to shape it into your desired shape.
- Transfer the pie to a floured peel and add sauce and toppings of your choice
- Place in the oven and bake for about 12 minutes (or until your desired level of doneness).
- Remove using the peel. Serve and enjoy.

Related Posts
-
 Chicago Deep Dish Pizza – Easy, and Delicious
Posted on Aug 5, 2024
-
 A Table for Two Tired Legs – A Tribute to Jerusalem Pizza, Highland Park
Posted on May 5, 2024
-
 A Table for Two Tired Legs – in Lakewood New Jersey
Posted on Jan 8, 2024
-
 Ess Gezint: Delicious Gluten Free Recipes for Thanksgiving and Chanukah
Posted on Nov 20, 2023
Tags
Share This


